Drawing the Roots of a Tree
In this lesson we draw the roots of an old tree, illustrating the process in a step by step approach.

- Drawing the Roots of a Tree
- tree-roots-8
Drawing the Roots of a Tree.
- tree-roots-1
The Line Drawing
- tree-roots-2
Applying a Texture
- tree-roots-3
Erasing Overlapping Texture
- tree-roots-4
Detailing the Textire with Line
- tree-roots-5
Building up the Tone (section 1)
- tree-roots-6
Building up the Tone (section 2)
- tree-roots-7
Building up the Tone (section 3)
- tree-roots-8
Establishing the Ground and Balancing the Tone

Our slide show illustrates the key stages of our drawing of tree roots to demonstrate the process from start to finish.
-
The best medium to use for this type of work is a set of charcoal pencils, which grade from light (hard) to medium to dark (soft).
-
A light grade charcoal pencil can be sharpened to a fine point for detailed work. The medium and darker grades are progressively blacker and softer making them more suitable for shading and blending tones.
-
A medium to heavy weight paper with a lightly textured surface is perfect for a detailed charcoal drawing. The texture of the paper provides an ideal grip for the charcoal and helps you to build up tones and textures.
- Finally, you need spray can of fixative to stabilise the drawing at various stages throughout the work.
Introduction

Tree roots reclaiming their territory in Old Cathcart Cemetery, Glasgow.
© www.artyfactory.com

Tree Roots in Queens Park, Glasgow (our source image)
© Louise Mackay
Trees are often seen as a symbol of strength, stability, and growth but they are also associated with the mythical and the magical. Their trunks and branches stretch to the heavens, but their roots disappear into the darker realms of the underworld. We can all enjoy the natural majesty of a tree, at least that part we see above ground, but when their twisted roots are exposed, our response is more foreboding. In the course of time this relationship between the above and the below (the heavens and the underworld) has been the inspiration for many mystical legends in art and literature. For example, in the first book of the bible, Adam and Eve encountered 'The Tree of the Knowledge of Good and Evil', and we all know how that ended. In Norse mythology we have Yggdrasil, the mythical ash tree that connects the Nine Realms of the Norse cosmos. The Buddhists have the Bohdi Tree, the sacred fig tree under which Buddha achieved enlightenment, while the World Trees that appear in the art of Mesoamerica link the sky, earth and underworld. There are many more examples of mythical and sacred trees, but you only have to look at the roots in our photographs above to see the compelling forms that inspired these iconic stories.
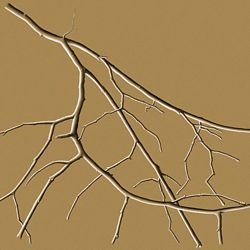
The Line Drawing

Intricate drawings like our study of tree roots are best approached in a step-by-step manner where you focus on each visual element separately, gradually building up the image as a series of layers, with each adding to the complexity of the image.
It is best to start with a line drawing which helps you observe and understand the shapes involved. At this stage we concentrate on the outline shape of each section of root and the odd flurry of flora or fungus attached to it. This is enough for the first stage of the drawing whose aim is to establish a strong foundation of shapes that we can build upon.
Applying a Texture

Next, we added an overall texture to the drawing.
-
This is done by very lightly trailing a soft charcoal pencil across the surface of the paper. The aim is to catch its ridges and pass over its troughs, thereby creating a light mottled texture that evenly spreads over the entire drawing.
-
Do not worry about going over the edges of the lines as these will be tidied up at the next stage.
Erasing Overlapping Texture

Now we clean up the texture by erasing those areas outside the lines. This starts to indicate the roughness that characterizes the surface of the bark, which we will later enhance with further layers to create a more realistic texture.
Detailing the Texture with Line

Next we draw in the lines that texture the bark. These lines represent the cracks and crevasses that warp its surface. We draw as many of these as possible from observation, then invent the rest to create a more unified texture. The result can be a bit confusing, but the next step is to reduce that confusion by resolving the form with light and shade.
Building up the Tone (section 1)

A detailed drawing such as this, takes time and patience and is impossible to complete in one sitting. Therefore, we have to build up the tonal details in several sections to make the process more manageable. For this drawing we have divided the image into three sections to cope with the volume of shading involved.
We create the tones in the drawing by using a range of charcoal pencils (light, medium and dark), together with a sharp eraser. As you are working across the drawing with a smudgeable medium, it is advisable to start on the left if you are right-handed or on the right if you are left-handed. This way you will avoid leaning on and smudging sections of the work you have already completed.
The Tonal Technique:
-
The first stage in building up the tone is to emphasise those rough lines that you wish to develop into shaded details. (You can see this effect in the unshaded area in top right of our illustrated detail.)
-
Next, you can gradually enhance the tone with more mottled texture, starting to build up the shaded details with a sharper pencil, and darkening those areas that are hidden from the light.
-
Those areas that catch the light were created with an eraser that has been cut to form a point or sharp edge. This was used to remove sections of charcoal to form areas and details of light.
-
The process of shading is gradually completed by repeating the previous steps to a greater or lesser degree until you achieve a satisfactory balance between the light and shade and texture of the bark.
- Finally, lightly spray this section of the drawing with some fixative to prevent any accidental smudging.
Building up the Tone (section 2)

In this section we tackle the trunk of the tree and the different types of detail therein.
-
The drawing technique for each section is the same as outlined in Step 3: Building up the Tone (section 1).
-
You will notice that the artist here is right-handed as they are working across the drawing from left to right in order to avoid smudging.
-
The details in this section are different as they progressively switch from the natural distortions of the bark to the weathered remains of initials once carved into the trunk.
-
The contrast of tones in this section is much more dramatic as they gradually change from light on the left, to an impenetrable dark in the hollow of the trunk. This is why you need a range of charcoal pencils as a hard/light pencil on its own is not capable of achieving the darkest tones.
- Don't forget a light spray of fixative to stabilise the drawing.
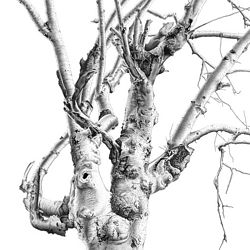
Building up the Tone (section 3)

In the right-hand section of the drawing, the tonal contrasts are weaker and generally darker as the trunk screens this area from the light source on the left.
- Remember the fixative when the section is complete.
Establishing the Ground and Balancing the Tone

The final stage in this drawing is to establish the ground area around the tree.
There are three parts to this stage:
-
Building up the texture of the ground surrounding the tree.
-
Tying the roots of the tree to the ground with convincing shadows.
- Deciding on the boundaries of the ground.
-
The texture of the ground is a mixture of soil and natural debris. Decomposing leaves and decaying matter create a more regular texture as their materials disintegrate. This effect is created much in the same way as the drawing of the roots. We started with a light mottled texture, over which we established a consistent structure of darker marks to represent the roughness of the ground. Finally, we emphasized this texture by picking out the highlights with a pointed eraser.
-
Finally, the roots of the tree need to relate to the ground from which they are emerging. To do this we determine where the light is coming from and plan the shadows accordingly (i.e. those areas of the roots and ground that are hidden from the light source). Types of shadows can vary from strong to weak depending on the strength of the light. We have tried to suggest a natural light that creates softly blended shadows, where the dark around the roots gently merges with the texture of the ground. This was done by sharply outlining the dark edges of the roots and softly smudging the tone over the leaves and soil. If you have applied fixative at the previous stages, this will protect the drawing below as you blend the tone over it, thereby creating shadows with a transparent quality.
- You have various options when it comes to deciding the boundaries of the ground:
-
You can extend it to the edge of the paper or create a smaller frame around it. However, displaying too much of the ground texture may detract from the impact of the roots, which after all are the main subject of the work.
-
You could gradually fade out the ground area, which after all the work you have already done, is a technically difficult task.
-
The solution that we chose was to create a perimeter that echoed the movement of the roots and harmonized with the shape of the drawing.
Drawing the Roots of a Tree - The Finished Drawing

In the finished work you can see that we have intensified the dark on the right-hand side of drawing, gradually lightening as it moves round to the left and the source of light. This helps to build up a stronger three dimensional quality and unify the three main sections of the image.


