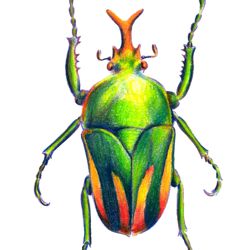
How to Draw a Beetle with Color Pencils
This lesson is a step by step demonstration of the drawing technique used to create a color pencil study of an exotic beetle.
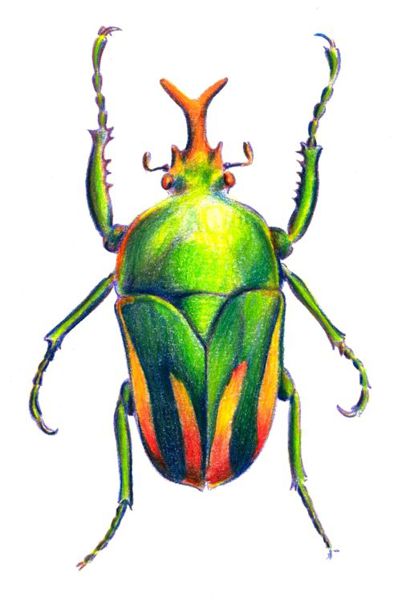
Our lesson on drawing a beetle is a step by step demonstration of the technique used to create a color pencil study of this exotic insect.
This scarab-like specimen, a member of the insect family Eudicella found in Kenya, was chosen for its colorful iridescent qualities.
Drawing a Beetle: Step 1
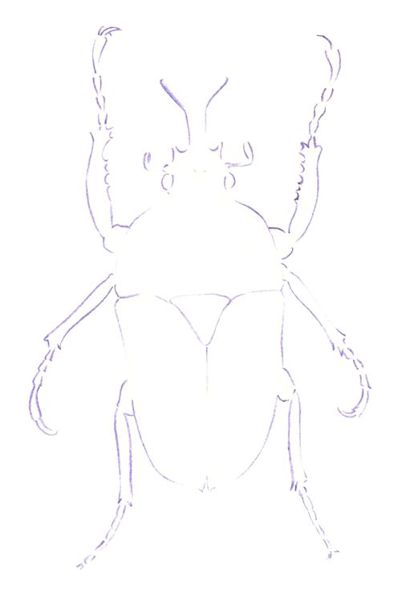
The first step in our beetle drawing is to establish its shape in line.
This is not a simple outline of the image. The weight of your line should vary to suggest the tones of your drawing. This will help you when you start to build up the tonal structure at the next stage of your work.
Note: Color pencils are a transparent medium which allows you to build up an image in several layers of tone and color. They are best used on white paper to show the maximum intensity of color pencils. A dark purple pencil is the ideal choice to create the line and tone of a color pencil drawing as it will blend harmoniously with most of the colors that are shaded over it.
Drawing a Beetle: Step 2
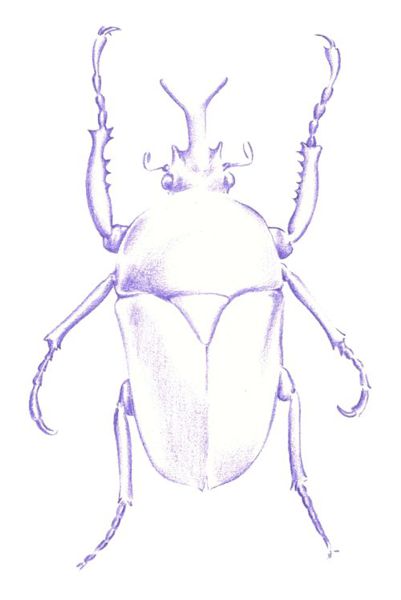
The second step in our beetle drawing is to build up the dark tones before you apply any color.
When you use color at a later stage, it should moderate but not obscure your tones. Softly graduated shading from dark to light is a useful technique that you should practice to improve your color pencil drawings.
Drawing a Beetle: Step 3
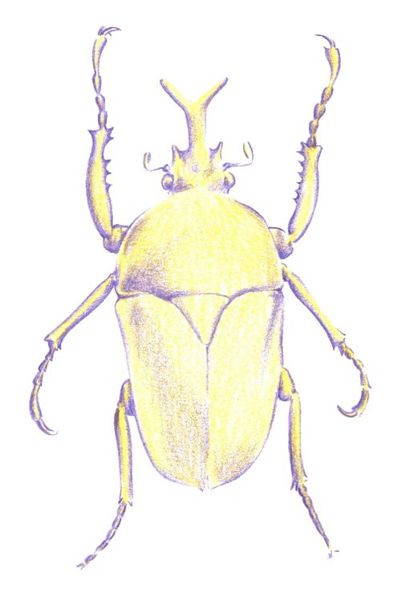
In the third step of our beetle drawing, yellow is lightly shaded over the image to establish a bright foundation that can be built upon.
Note: Color pencil drawing is a methodical and thoughtful process. First you establish the tonal structure of the drawing and then you apply your colors in layers, starting with the brightest and working towards the darkest and strongest. If you want an area of a drawing to appear white or bright, do not use a white color pencil as they are actually quite dull. Let the unshaded white of the paper do the work and you will get a more vibrant result. White pencils are really designed for use on colored papers.
Drawing a Beetle: Step 4
In the fourth step of our drawing, some blue and green has been lightly shaded over the yellow foundation to establish the color pattern of the beetle. At this stage the drawing is cautiously understated as you are still searching for a balance between the colors, tones and pattern.
Note: You must begin to apply the darker colors cautiously to ensure that you do not shade over the brighter areas of your drawing. These need to be kept light and fresh to help you create strong luminous contrasts at the end of the work. You will have more control and will get a better result if you gradually build up the density of dark colors than if you apply them heavily from the start.
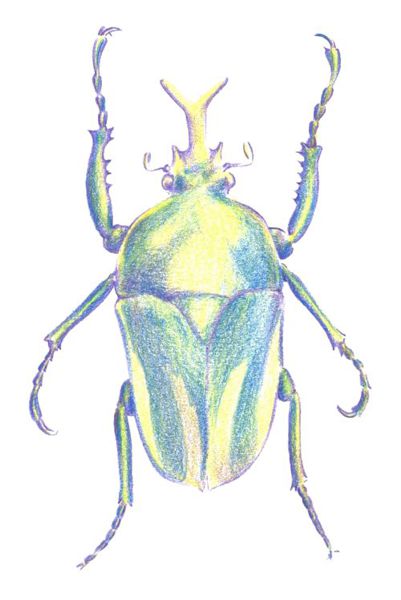
Drawing a Beetle: Step 5
The fifth step in our beetle drawing is to build up the warmer sections of image and settle on an overall balance of color, tone and pattern.
A scarlet red is applied and turns to hues of orange when it is shaded over the yellow, but it also turns into purples and browns as it covers the blues and greens respectively.
Note: As color pencils are a transparent medium you need to explore how they mix and blend. You can get different results when mixing equal amounts of the same two colors. For example, if you shade yellow over blue, you will get a different shade of green than if you shade blue over yellow.
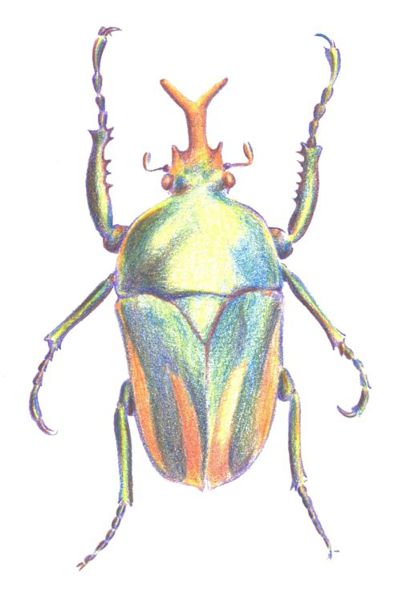
Drawing a Beetle: Step 6
The final step in our beetle drawing is to heighten the contrasts of color, tone and pattern to their highest expressive pitch without disturbing the overall balance of the image. This is done by building up heavier layers of all the colors you have previously used.
Note: The previous steps of this drawing illustrate a cautious approach to building our image of a beetle. The idea behind this method was enable you to lay a strong foundation for the final step where you can confidently and knowledgeably apply your color with its maximum intensity.
Remember: It is important to keep your pencils sharp throughout the drawing! You cannot create strong, sharp, colorful images with blunt pencils.